Distance Learning Film: Camera Focuses
Persona
Today’s the final lesson in our camera operation classes intended for social distancing learning online. I covered basic shots, the importance of angles, and the use of movement. I also kicked these lessons off with a brief look at the rule of thirds. In today’s last segment, I’m going to bring up the last minor technique that hasn’t been utilized yet, but remains as necessary when you put all of the previous instalments together: the intended focus of a shot. It seems simple. Wouldn’t you want to see everything you’re capturing? Well, yes and no. For some shots, filmmakers and cinematographers favour getting creative with everything, down to the blurriness and sharpness of focal points in a shot. There aren’t as many glorious practices that can take place here, but there are enough to cover.
When fooling around with focuses in a shot, you need to determine the purpose of the shot, and why you would want to fool around with what one can see anyway. In order to organize what can be done with focuses artistically, the first priority is to understand what is being captured. So, we start where we have to start:
Your Subjects
What are you intending to shoot? What are you conveying with your focusing? For any type of shot previously covered, organizing focal points is a must. You can use the rule of thirds, or organize your subjects in any other way you desire. You must at least plan what you are shooting before you start. You can understand that films are storyboarded before they are shot, so it is likely that almost every shot you see was painstakingly planned ahead of time. So, if you want to capture one person, it’s called a single shot. With two characters, you have a two shot; three is a three shot, four is a four shot, and so on and so forth. What can you do with one person on screen? How about three? What about an entire army?
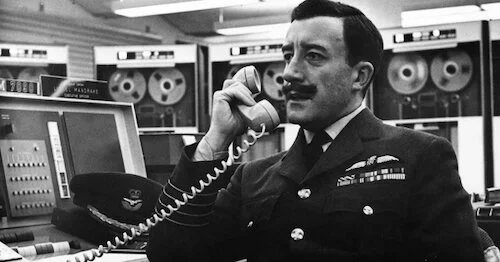
Dr. Strangelove or: How I Learned to Stop Worrying and Love the Bomb
The focal point in this one shot is close to the foreground, with a slight blur behind him. He stands out as much as he needs to.
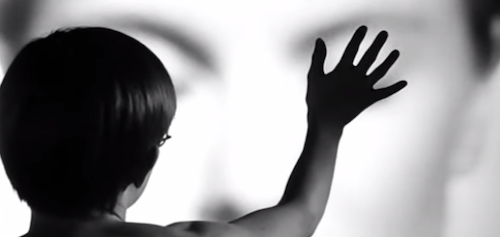
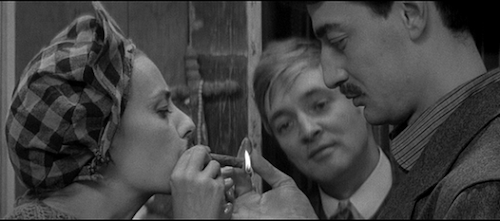
Mulholland Drive
The other theatre patrons behind the two lead characters aren’t important for this shot, so they are shoved further back, and the shot is placed at a bit of an angle. The two main characters are heavily focused on.
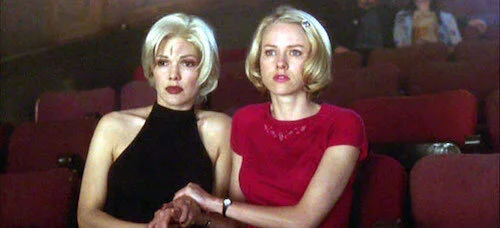
Jules et Jim
Even though these three characters crowd the image, this three shot demands that all members are in clear view, because they are all pertinent to this very image.
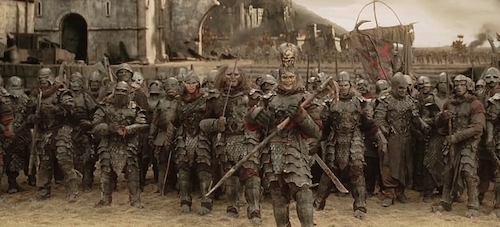
The Lord of the Rings: The Return of the King
Of course, you can’t see every warrior here, but having this wide shot in clear focus (for the foreground) is important to represent the magnitude of what the heroes of this film will have to face.
Evidently, what, or who, is being shot is very important before you even begin your shot composition, but it will affect the focusing of the shot just as greatly. Your focal point at any given time has to be extremely clear, otherwise your audience will be confused. Before we get into the different types of focuses, allow these two separate types of shots to drive the necessity of composition home.
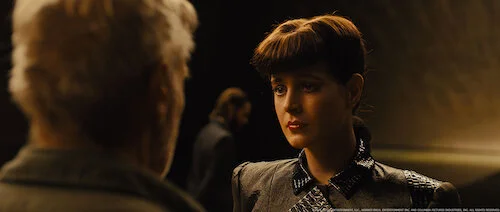
Blade Runner 2049
The above shot is an over-the-shoulder shot, which places an emphasis on focusing. Notice how the android further away is in clear focus, while the character closer to us is blurred. The shot is set up so we aren’t distracted by the being closer to us, because we’re meant to pay attention to the character further away at this given point. We still get a sense of where this conversation is taking place, and what a bystander might see, but the shot doesn’t feel overcrowded.
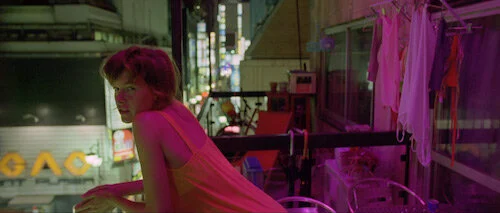
Enter the Void
Speaking of perspectives, there’s the ever-popular point of view shot (or POV), where we see what a character is looking at. To solidify this perspective, a cinematographer can choose to skew a scene a little bit. The above shot from Enter the Void (a film made to represent someone’s perspective for most of its duration) has a slight warp to it, reducing any flatness that may ruin the illusion. The opposite character is looking “us” right in the “eyes”. This kind of example needs to be seen in action for it to really make sense. Here’s a scene from Being John Malkovich where someone enters a portal to, well, be the actor John Malkovich. The perspective has a dark border, but it’s also warped and slightly oddly focused, indicating that we’re seeing the world through someone else’s eyes.
Now that we have wrapped up what we’re focusing on, and who may be focusing, let’s get started.
Deep Focus
Your first thought may have been that everything in a shot should be able to be seen. Even though I’m going to introduce a few tricks that break that notion, the very first tip actually heightens that rule of thumb. Deep focusing is the art of capturing everything in a shot with a proper, clear focus. However, this can also be used artistically, by pushing boundaries. Filmmakers can test how far their focus can actually go, to lengthen a room or to keep all characters — featured in the foreground or background — in a prominent position at all times. This can create a pleasing effect, like noticing layers coexisting independently.
Citizen Kane is iconic for its uses of deep focus. There are many examples to pick from, but this scene does the trick. We can see the conversation in the foreground just as well as we see the strolling man on the other side of the room; all three of whom are important to the current point of the scene (the discussion involving all parties represented here).
Shallow Focus
This is where things change a little bit. Shallow focusing is the opposite. It’s the sole focus on one subject, and the blurring of everything else. This can cause an extreme amount of attention on a focal point. This can also be used to represent dreariness, a lack of attention, teary eyes, and other types of sensations. Finally, shallow focuses can be used to cleverly hide something that may be a narrative twist or too graphic to show in full. Have a focal point be clearly shown, and their surroundings blurred, so audiences get a sense of what is happening, but don’t fully see it for themselves.
This Moonlight clip features a difficult conversation, so everything else surrounding both characters is blurred for a duration of the scene.
Warning: May contain spoilers and brief foul language. Reader discretion is advised.
Rack Focus
Now that blurriness and focal point optimization is considered, focuses can be toyed with. Rack focus (or a focus pull) is the art of swapping between focal points using blurriness and the clearing up of a target. You can use this technique for many different artistic choices: the swapping of two subjects to create a paired set of reactions, a cause-and-effect response, showing a foreground and a background at slightly different times without cutting, and more. These types of shots allow viewers to digest one thing at a time. They can also be used creatively in a myriad of ways (one example featured below).
Firstly, let’s look at a solid example. In this scene from The Graduate, a focus pull is used towards the end to capture an initial shock, and then a slowly developing realization that gestates into hurt.
Warning: Contains spoilers. Reader discretion is advised.
For a more creative take, all of The Diving Bell and the Butterfly as a film toys with perspectives and focuses. In this scene, a paralyzed man is wheeled to his wife to meet for the first time since his stroke. Shot to look like it is all from his perspective, this entire clip has countless focal-point switches made possible with focus pulling. By the end, his focus is very clear, compared to the rest of the scene where his eyes dart around.
Bonus: Fisheye Lens
That’s pretty much it when it comes to focuses. So, we will wrap up our camera lessons with two frequently used tricks that also deal with perspectives. Have you ever noticed a scene or a music video that looks incredibly round, like you’re looking through a door viewer? Well, that’s performed by a special type of lens known casually as a fisheye lens. This greatly distorts a shot, causing everything in an image to be round. This stretches out the centre, but also shrinks the surroundings of a shot, filling in as much of one’s surroundings as possible into a single image. It’s often used for disorientation, or to dazzle up a shot as aesthetically as possible in such a way. Overuse of this lens is not recommended.
Take this sequence from The Favourite: a film that heavily uses fisheye lens shots (but cleverly). A good portion of this sequence is shot with such a lens, and yet the scene’s varying degrees of distortion allow the images to not suffocate. Implying the slow delirium of an ailing queen, this scene puts enough of a warp on beautiful imagery to represent an uneasiness at all times.
Bonus: Tilt-Shift Focus
We also have the 21st century trend of tilt-shift focusing, which is more of a fad in photography, but has made its rounds in film as well. Using specific lenses, focal points, and strategic blurring, images can be made to look miniature, or just drastically different in any sort of way. This is used to take familiar or tired images, and put a spin on them, rendering them captivating once more.
The beginning of this scene in The Social Network is shot with a tilt-shift focus, so the Harvard campus looks almost like a set of miniatures, giving us a new look at a university that’s been represented to death in cinema (including this very film).
Thank you for reading all of my lessons on camera techniques regarding shot creation. I will make more modules in the future on all things film, including colour usage and lighting, in regards to cinematography.
Andreas Babiolakis has a Masters degree in Film and Photography Preservation and Collections Management from Ryerson University, as well as a Bachelors degree in Cinema Studies from York University. His favourite times of year are the Criterion Collection flash sales and the annual Toronto International Film Festival.